Sunday, March 21, 2010

Gift In A Bucket


Gift bags are boring and a waste of money since they most always get thrown away. While browsing through the toy section I saw these sand buckets. They were only $1! That's when it dawned on me that a bucket would make a great gift "bag" for a child's gift. What child doesn't love a bucket to tote their toys in or play in the dirt? An added bonus is that it costs less or the same as a regular gift bag. Add tissue paper and a tag and you have an impressive child gift.

Close To My Heart Products Used: (X7108B) Daydream Paper Packet, (D1299) Thoughtful Seasons stamp set, (Z1052) Ricrac Ribbon, (Z2106) Blush Ink Pad

Tuesday, March 16, 2010

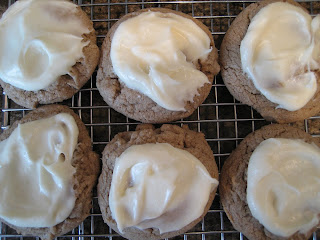
Cake Mix Cookies Recipe


I tried two different types of cake mixes. I used a spice cake mix and dropped them with a 2 tablespoon scoop. They were very soft and dense (above picture). The Chocolate cake mix I used I dropped them with a tablespoon scoop, like the recipe says. They turned out flat and a bit crisper. Not sure what the difference was, but I preferred the spice cake mix cookies over the chocolate. On the website I found this recipe they had tried Funfetti cake mixe and yellow cake mix and they raved how good they were. With the 2 tablespoon scoop I got about 20 cookies, with the 1 tablespoon scoop I got 24.

Cake Mix Cookies
Ingredients:
18 oz. pkg. cake mix (any flavor)
1/2 cup butter, softened
1 egg
Preparation: Preheat oven to 350 degrees. In a large bowl, combine all ingredients at low speed until dry ingredients are moistened and dough is thoroughly mixed (I used my hands to knead it together, seemed to work better). Drop dough by rounded tablespoonfuls 2 inches apart onto ungreased cookie sheets. Bake at 350 for 9-12 minutes. Cool two minutes on cookie sheets, then remove to wire racks to cool.
If using chocolate cake mix, add 2 Tbsp. water along with egg. You can stir in chocolate chips, coated candy pieces, chopped nuts, or oatmeal. Frost the cookies, using canned frosting, or make sandwich cookies by spreading frosting between two cookies. These Cake Mix Cookies should be stored tightly covered at room temperature so they stay soft.

Monday, March 8, 2010

Card Madness In March Workshop

The date has passed to sign up to join us for the workshop at my home, but you can still host your own and get free cards! More details below:
Serendipity Cards (Paper Sold Out)
Stardust Cards
A card is an item I never seem to have enough of. I don't always have time to sit down and make up an original card every time I need one. So I came up with a pattern that allows you to make 8 cards using 2 background and texture papers and a few accents! Each card only costs about $.62 and that includes envelopes! I got March's Stamp of the Month, which is perfect for making cards for many occasions and after making several sets of cards I knew I had to share the pattern! That is how the Card Madness In March Card Workshop was born. Join me on Friday March 26th @ 7pm at my home to learn how to make 8 cards using my original pattern. You can host a workshop and get your cards FREE!
Kit Options:
Basic Kit $5.00- Includes card bases and envelopes for 8 cards, 2 B&T papers, Accent Pack (accents may vary), and Cutting Guide.
Better Kit- $28.80 ($2.50 discount) - Includes Basic kit plus the stamp set A Little Of Everything, only available in March!
Best Kit - $38.30 ($5.00 discount) - Includes Basic kit, Stamp Set A Little of Everything, & Two Stamp Pads to coordinate with your paper choice.

Please sign up and prepay by Monday March 15th!
Stamp Set: A Little Of Everything

Get the Basic kit for FREE by hosting your own Card Madness Workshop! Call or email me for more details and to set a date.

Don't have the time? I will make your cards for you! A set of 8 cards for only $8.00. Simply choose which papers you'd like. Call or email me to make your selection.

I am offering a few different back ground and texture paper choices. It's first come first serve on the selection. See below for options.

Paper Choices top row: Animal Cookie & Stardust
Second Row: Daydream & Veranda
Bottom Row: Silhouette, Vroom, Life's Delight, Empoium, Magic Moments, Serendipity


Veranda Cards

Tuesday, February 23, 2010

Shamrock

I believe I have mentioned before that my friend Beckie does a monthly craft night. I love it because then I get cute crafts that I don't have to think up and she gets all the supplies and has them ready for you! This was last months. I was originally going to paint it, then she suggested modge podging paper on it instead. Glad she did, and I knew of the perfect paper to do it with. I used one of CTMH's newest paper packets called Veranda. I also used Cocoa Grosgrain ribbon and two pewter brads. I used CTMH's distressing ink in chocolate to distress the edges. The paint color I used is called Burnt Umber. Thanks Beckie you're awesome!

Monday, February 15, 2010

True Friends

5 years ago I quit my job to stay home with son, then 9 months old. It wasn't my most favorite job, but I worked with the most wonderful people. I was sad to not see and talk to them on a daily basis. Life took over and I kinda lost touch. Every so often I'd get an email and more recently, facebook messages. We decided a lunch date was way past due. I wanted to bring them a little something because I had found this great quote and had made a tag, I just needed something to attach it to. After pondering and looking for a week an idea finally came to me the night before we were going to meet. When I'm having a bad day there is one thing that can usually make it better....a fabulous treat. I discovered these wonderful squares of joy last summer at our local Maverick. I even dream about these little lovelies. What better thing to share with your friends, then one of your most favorite things that bring you such happiness.

CTMH Products Used (listed with item # then name of item): X7119B Veranda Level 2 Paper Packet, X5642 Cocoa Cardstock, Z2114 Cocoa Ink Pad, Z1300 Just Blooms White Daisy Collection, Z1217 Metal Brads Assortment. If you'd like to order any of these items call, email, or click HERE to go shopping!

Wednesday, February 10, 2010

Sour Cream Sugar Cookies

Just in time for Valentines Day. I've had this recipe for awhile and wanted to try it. I don't know why, but I crave sugar cookie dough and cookies. Then I make them, eat too much and am sick. These turned out great! I didn't have butter flavored shortening, so I used regular but I suspect they'd be even better with the butter flavored. I got this recipe from another Close To My Heart consultant's website. Her name is Karen Pedersen and these are her cookies.


Karen's Sour Cream Sugar Cookies
makes about 4 doz. depending on size of cookie cutter

Cream together:
2 C. sugar
1 C. butter flavored shortening
2 C. sour cream

Add and beat:
1 eggs
1 tea. vanilla

Stir in:
4 1/2 C. flour
1 tea. soda
1 1/2 tea. salt

Roll out on a nicely floured counter. Knead in as much more flour as it feels it needs before you roll it out. Roll to about 1/4" thick and use cookie cutters of your choice. Bake at 375 degrees for about 10 minutes, or until done.

Butter Cream Frosting (also Karen's)

1 stick butter, softened
4 C. powdered sugar
1 tea. vanilla
dash of salt
1/4 C. milk (or a bit more if needed)

Put all ingredients in mixing bowl and beat until smooth. You can add a few tablespoons of cocoa to make chocolate frosting, a drop of mint extract for mint frosting, or even just food coloring for color.

Tuesday, February 2, 2010

For Those You Love

Valentine's is coming. I've never really liked the holiday, but I have to admit I do have fun making cute cards and gifts for those I love. I wanted to give you a few ideas that are easy to make and will show your loved one how much you care.

Can: Open the bottom of any size can and empty the contents. SAVE THE LID! Clean and let air dry. Decorate and then fill with goodies. Use a magnet to hold the lid in place while you apply liquid glass, or hot glue to seal the can again (the new seal should be on the bottom).
Bagelope: Take any sized envelope (long ones work best). Seal the flap down. Cut about 3 inches down using decorative scissors. Decorate, fill with goodies, then slip the "lid" back on.
Goodies: Get a bag of Hersey's nuggets and a package of address labels. Take a sheet of labels and random stamp the whole sheet. You'll want it to be pretty crowded. Peel off the label and stick around the nugget candy. So easy and so cute! Treat boxes: If you would like detailed instruction on any of these please email me.
Note: Unfortunately the stamp sets I used are retired, BUT there are a ton of new cute ones to choose from. You can go here to check out our selection.